| Authors note: I wrote this article in 2003 for AmericanJeepers.com. That site is long gone, but I still get asked questions about this swap frequently. The axle I built this on is has been sold for a while, but this swap was of the best mods I ever did to my YJ. I recommend it for anyone that is planning on keeping a dana 30 for any period of time.This article is YJ specific because I have first hand knowledge of this install on aYJ. While there is a lot of documentation on this swap online, I found much of it to be false or inexperienced. Therefore, I will not rely on that info to relate this swap to TJ’s and XJ’s. Please feel free to contact me with questions and I will help to the best of my ability if you attempt this swap on any other Jeep model.
|

For a Jeep in stock form, and even with mild lift, stock steering and brakes are adequate on the street and on the trail. Leaf sprung Jeeps obviously aren’t meant to be sports cars, and as such they don’t handle and brake like them (nor do most SWB rigs.)
With lifts up to 4” many steering issues (such as bump steer, poor road feedback, etc…) can usually be solved with the installation of a drop pitman arm. When it comes to steering your main goal is to minimize the angle of the drag link relative to the ground. The steeper this angle the more your steering wheel has to turn to compensate for the drag link length as your suspension compresses and unloads. With a mild lift a drop pitman arm will put this angle near stock.
Your next goal would be to match the angle of the drag link and the angle of thetrac bar as equal as possible, if you still have one installed. This keeps the drag link and trac bar from fighting each other because of unequal length as your suspension compresses. Your lift kit traction bar brackets should hopefully take care of this issue.
On lifts above 4”, even with a drop pitman arm, the angle of the drag link becomes too severe. There are a few kits online to correct this. Some include a high steer arm that you bolt to your passenger steering knuckle, others include a whole new knuckle, and one company takes a stock knuckle and welds on a high steer arm. I do not recommend the latter, search Google on “Welding Cast” and you probably won’t either.While those kits do address the issue of a severe drag link angle by raising the attachment point for the drag link, they don’t address the factory brakes. You’re lifting your Jeep to run bigger rubber and you’re going to drive it on the road with the brakes designed for 29” tires?! Another con of the other setups is cost; because of demand and rarity they can be rather expensive. But don’t fret!
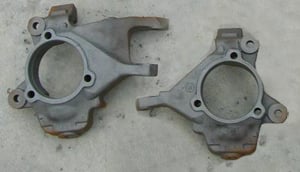 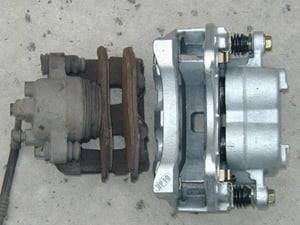 |
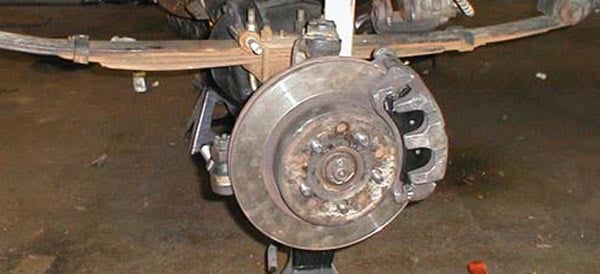
There is another solution; in my honest opinion, a better, cheaper, more fulfilling one. It just so happens that the Jeep WJ’s(1999+ Grand Cherokees) have a knuckle with an attachment point for the tie-rod in the stock location, and an attachment point for the drag-link up higher. WJ’salso have HUGE dual piston calipers and larger brake rotors to match. The knuckles are a bolt on to YJ, TJ, and XJ Dana 30’s. It’s a win-win situation as far as I’m concerned.Necessary Parts List
|
*Caliper Notice…
The WJ has two caliper styles. (Teves and Akebono) Because of some warping problems there was a recall and the old style (Teves) has been replaced on a lot of old models. For instance, the 03’+ style (Akebono) came with my parts from a 99 model. Read more about the changes here…http://www.wjjeeps.com/brakes.htmIf your calipers look like mine your pad part number is 9454 at AutoZone. Other places will be some version of that be it 945 or 945Z… whatever. It was difficult finding this style in stock. If you open the box and the pad has ears, they are not what you’re looking for.If your calipers DON’T look like mine your part number at AutoZone is 7904. Your pads will have ears.Optional Parts
- New brake pads (may as well while your doing this)
- Ball Joints (great time to replace them)
- Axle shaft u-joints (great time to replace them)
- Extended stainless brake lines (depending on lift)
Necessary Specialty Tools
- Threadlocker
- Antseize
- 36mm socket
- 13mm 12point socket
- 1 ¼” metal hole saw
- ½” metal drill bit
- Pickle fork.
- Ball joint press (only if you’re replacing the ball joints)
- U-joint press (only if you’re replacing the u-joints)
Instructions
- Take your WJ knuckles and ¼” hub spacers to a reputable welder to be welded.
- You may want to bolt a hub on them to assure proper alignment.
- Support the axle on jack stands and remove the front wheels.
- Break loose and remove the hub nuts with a 36mm socket
- Either use an impact, or have someone press on the brakes while you use a breaker bar to loosen them.
- Remove the stock brake calipers from the knuckle (13mm socket)
- Remove the brake hose from the calipers.
- Tie the hose up in the fender to keep fluid leakage to a minimum
- Remove the stock hubs (13mm 12 point socket)
- If they are stubborn use a slide hammer to remove them.
- Another method is to thread the bolts out a few threads, put a junk 13mm socket over them, and hit the socket with a hammer alternating bolt heads hammer down on the flat part at the top of the knuckle. I would replace the bolts after using this method.
- Pull the axle shafts
- Remove the tie rod end castle nut cotter pins, and then remove the nuts.
- Remove the TRE’s by using a pickle fork, or by tapping on the side of the knuckle arm till they fall out.
- Remove the upper and lower ball joint castle nut cotter pins, and then remove the nuts.
- Remove the knuckle by using a pickle fork, or if your replacing the ball joints hammer down on the knuckle.
- Replace ball joints if necessary.
- Install the WJ knuckles
- Be sure and use new cotter pins on the castle nuts.
- Replace the axle shaft u-joints, if necessary, and install the shafts into the housing.
- Bolt the caliper bracket to the knuckle, if it’s not already
- Apply some threadlocker to the threads.
- Install the stock YJ hubs and hub nuts.
- I always use antiseize on the hub flange and on the axle shaft splines, this makes the assembly easy to remove next time.
- Use your stock YJ rotor as a template and drill the WJ rotor to the 4 on 4.5” bolt pattern using a 1/2” drill bit.
- If you don’t have a drill press, or aren’t comfortable doing this 100% accurately ask your local machine shop to do it for you.
- Install the rotor.
- Make four 1 ¼” x ¼” spacers with your hole saw. Drill a ½” hole in the center. These will space the calipers out to meet the newly spaced out hubs.
- Install the new pads into the calipers.
- Bolt the calipers to the brackets.
- Apply some threadlocker to the threads.
- Bolt the rubber brake hoses to the new calipers.
- Because of the design of the WJ calipers you will lose a little of your brake line length. You may or may not need longer brake lines at this time.
- Bleed the brakes.
- Install the wheels and check caliper clearance.
- Depending on wheel size, style, and backspacing you may need to grind a little of the WJ caliper. PROCEED WITH CAUTION. There isn’t A LOT of metal there to safely grind.
- The old style WJ calipers are slightly smaller than the new ones, you may need to purchase a set of those if light grinding on the new style doesn’t solve the contact issue.
- In EXTREME cases you may need to purchase new wheels to clear.
- I had no issues with my 15×10” American Eagle 054’s with 3 5/8” backspacing. No grinding was needed.
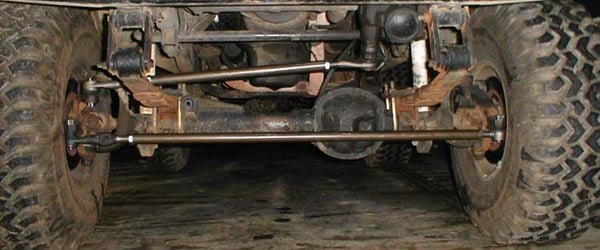
SteeringThere are TONS of options for steering linkages with this setup, this section is just a general overview of my setup. Search online for more info on your preferred style. Because of personal preference I chose to use tie rod ends over heim joints. Because of strength and availability I chose 1 ton Chevy TRE’s. If you want to go with a true high steer setup you can order the driver side knucle from right hand drive WJ’s (Europe, Austrailia, etc…) It is a mirror image of the US passanger one. You would use both higher arms on the knuckle in an inverted “T” setup. Contact your Jeep dealer for part numbers/pricing.Parts (my setup)
- Passenger knuckle TRE #ES2233L
- Driver knuckle TRE #ES2010R
- Pitman misalignment TRE #ES2027L
- Knuckle/Draglink misalignment TRE #ES2026R
- 2 x 7/8-18tpi Left Hand Jam Nuts
- 2 x 7/8-18tpi Right Hand Jam Nuts
- DOM tie rod and drag link (drilled and tapped for the TRE’s)
- You can also purchase threaded inserts that you weld into DOM tubing. I would use this option if you don’t want to drill and tap your own DOM.
Specialty tools
- Reamer 1.5″ per foot
Part/tool sources
- DOM Rock Rods (JCR part# no longer available)
- 1/4″ hub spacers (JKS part# JKS930)
- Tie Rod Ends (local parts store)
- GM Jam Nuts (Parts Mike part# PM805)
- Reamer for tie rod ends (XKUT part# 5925)
Installed Pics